C# asp.net WebService 接收Http POST 的請求
最全面的商業實戰 API教學 - WebService 建置
嗨~ 我是 IG 雞湯工程師 歡迎大家追蹤我喔~
建WebService 的目地是要接收API的請求,是銜接前一篇的 C# asp.net WebClient 的 API串接 。
沒看過的可以先看喔~。
使用版本:VS 2017~2019
WebService 的程式:
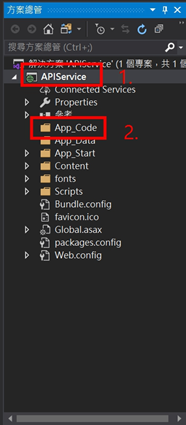
1. 首先一樣先建立好WebForm的專案
2.並加入App_Code的資料夾
用意就是要用來存放API的資料夾。

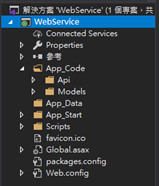
3. 建立了 Api、Models的資料夾
規劃是用Api當作放API的地方。
Models資料夾 是放 欄位物件的地方。

4. 在App_Code 的 Api資料夾裡面,新增一個Web API,名稱為UserController。
這就是提供服務的API喔!!

5. 貼上程式碼,這邊就是API裡面的內容,一個簡單的欄位檢核,如果詢問的UID正確,會回傳其他資料給Client。
using System;
using System.Collections.Generic;
using System.Linq;
using System.Net;
using System.Net.Http;
using System.Web.Http;
using WebService.App_Code.Models;
namespace WebService.App_Code.Api
{
public class UserController : ApiController
{
//1.1設定此支API 只接受post的要求
[HttpPost]
public object UserName(GetUID GetData)
{
//2.定一要回傳的資料格式欄位
UserNameModel.returnMsg TestResult = new UserNameModel.returnMsg();
UserNameModel.UserData TestUserData = new UserNameModel.UserData();
//3.判斷 Post進來的資料,並回傳對應的資料回去
if (!string.IsNullOrEmpty(GetData.UID) && GetData.UID == "12345")
{
TestUserData.Name = "Jim";
TestUserData.phone = 3345678;
TestUserData.UID = "A12345678";
TestResult.Result = " 成功";
TestResult.Status = "S";
TestResult.UserData = TestUserData;
}
else if (string.IsNullOrEmpty(GetData.UID))
{
TestResult.Result = "輸入資料為空";
TestResult.Status = "F";
}
else
{
TestResult.Result = "所查詢的資料不存在,請重新查詢";
TestResult.Status = "F";
}
return TestResult;
}
//1.2定義接收資料的欄位名稱,如果Post的欄位名稱錯誤,會有讀不到資料的情況。
public class GetUID
{
public string UID;
}
}
}
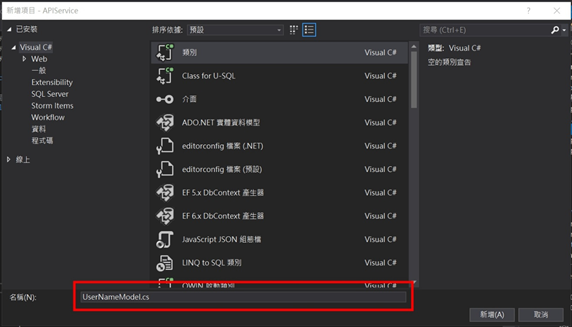
6. 接下來是設定一些會用到的欄位。
在App_Code 的 Models資料夾裡面,新增一個Class,名稱為UserNameModel。


7.貼上程式碼
using System;
using System.Collections.Generic;
using System.Linq;
using System.Web;
namespace WebService.App_Code.Models
{
public class UserNameModel
{
public class returnMsg
{
public string Result { get; set; }
public string Status { get; set; }
public UserData UserData { get; set; }
}
public class UserData
{
public string UID { get; set; }
public string Name { get; set; }
public int phone { get; set; }
}
}
}
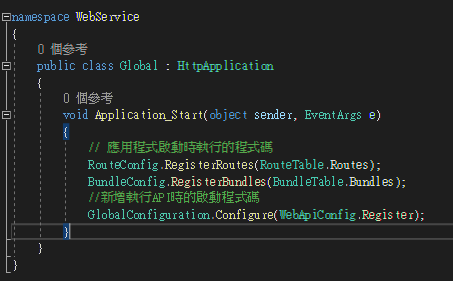
8. 接下來,補上最重要的東西。我們只建好了API,但沒跟系統說我要接收Http Request ,所以要跟系統說明,接受到Request的時候呼叫出這隻API出來用。
找到->Global.asax
這邊是程式啟動的起始點,先跟系統說會用到哪一些功能、應用程式服務,先設定好。
GlobalConfiguration.Configure(WebApiConfig.Register); -> 就是一種應用程式服務喔。

程式碼:
using System;
using System.Collections.Generic;
using System.Linq;
using System.Web;
using System.Web.Http;
using System.Web.Optimization;
using System.Web.Routing;
using System.Web.Security;
using System.Web.SessionState;
namespace WebService
{
public class Global : HttpApplication
{
void Application_Start(object sender, EventArgs e)
{
// 應用程式啟動時執行的程式碼
RouteConfig.RegisterRoutes(RouteTable.Routes);
BundleConfig.RegisterBundles(BundleTable.Bundles);
//新增執行API時的啟動程式碼
GlobalConfiguration.Configure(WebApiConfig.Register);
}
}
}
9.以上就初步的建好Service囉,觀念其實還有很多,不過先學實用的最重要~
